Scott's Blog

学则不固, 知则不惑

0%

Pandas 数据处理技巧

一些数据处理小技巧,不成体系。

了解文件

1
2
3
4
5
6
7
8
9
10
11
12
13
14
15
16
17
18
19
20
21
22
23
24
25
26
27
28
29
30
31
32
33
34
35
## 读取数据
# csv, excel, txt, etc...
import pandas as pd
sndata = pd.read_csv("path")

## 查看数据结构和类型
sndata.dtypes

## 查看index
sndata.index
> index是可以定义的,默认是1,2,3,也可以是a,b,c

## 查看列名
sndata.columns

## 查看缺失的数据
sndata.isnull()

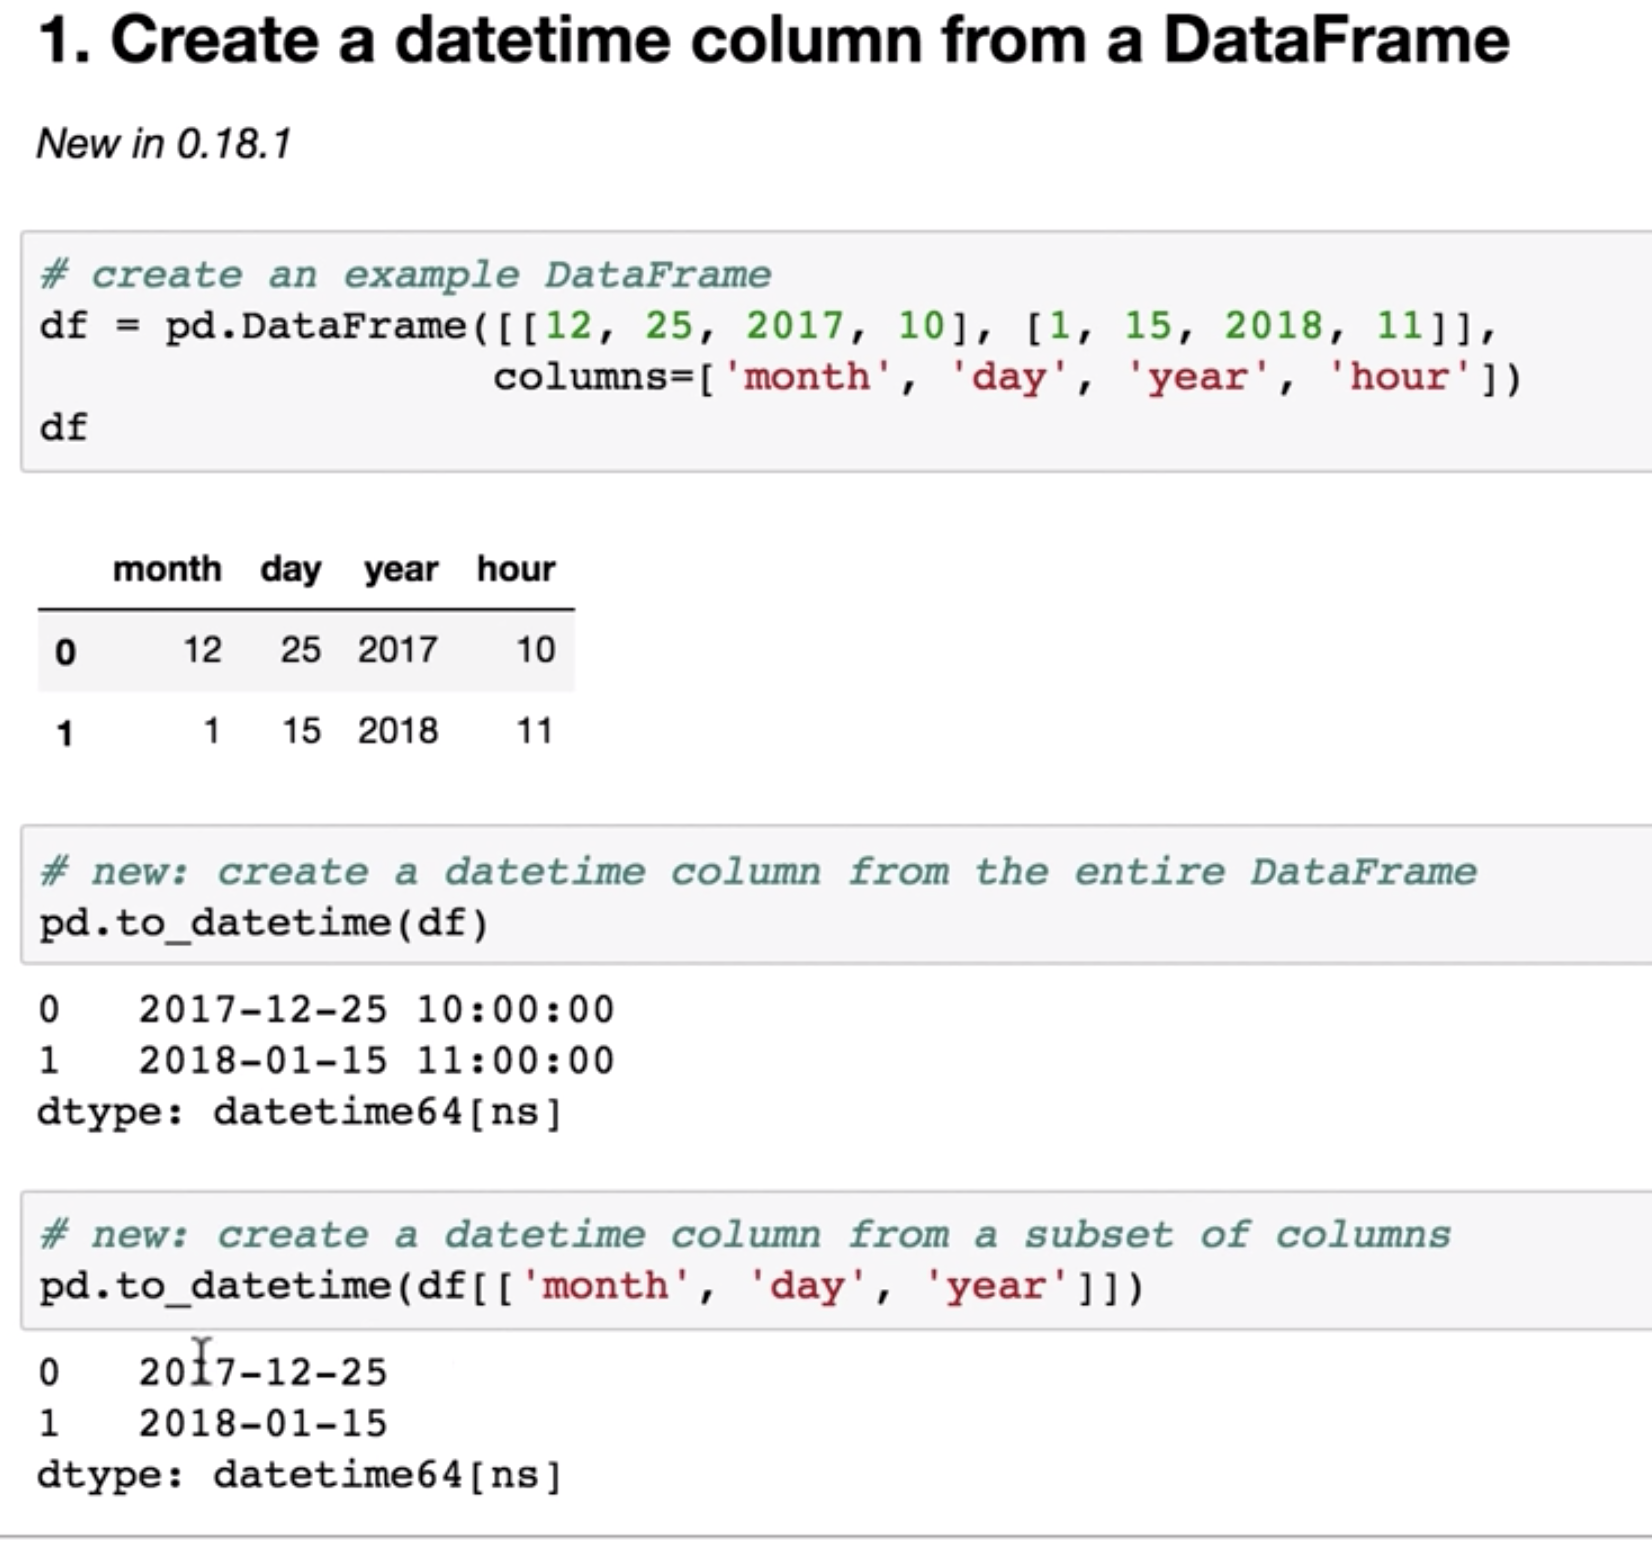
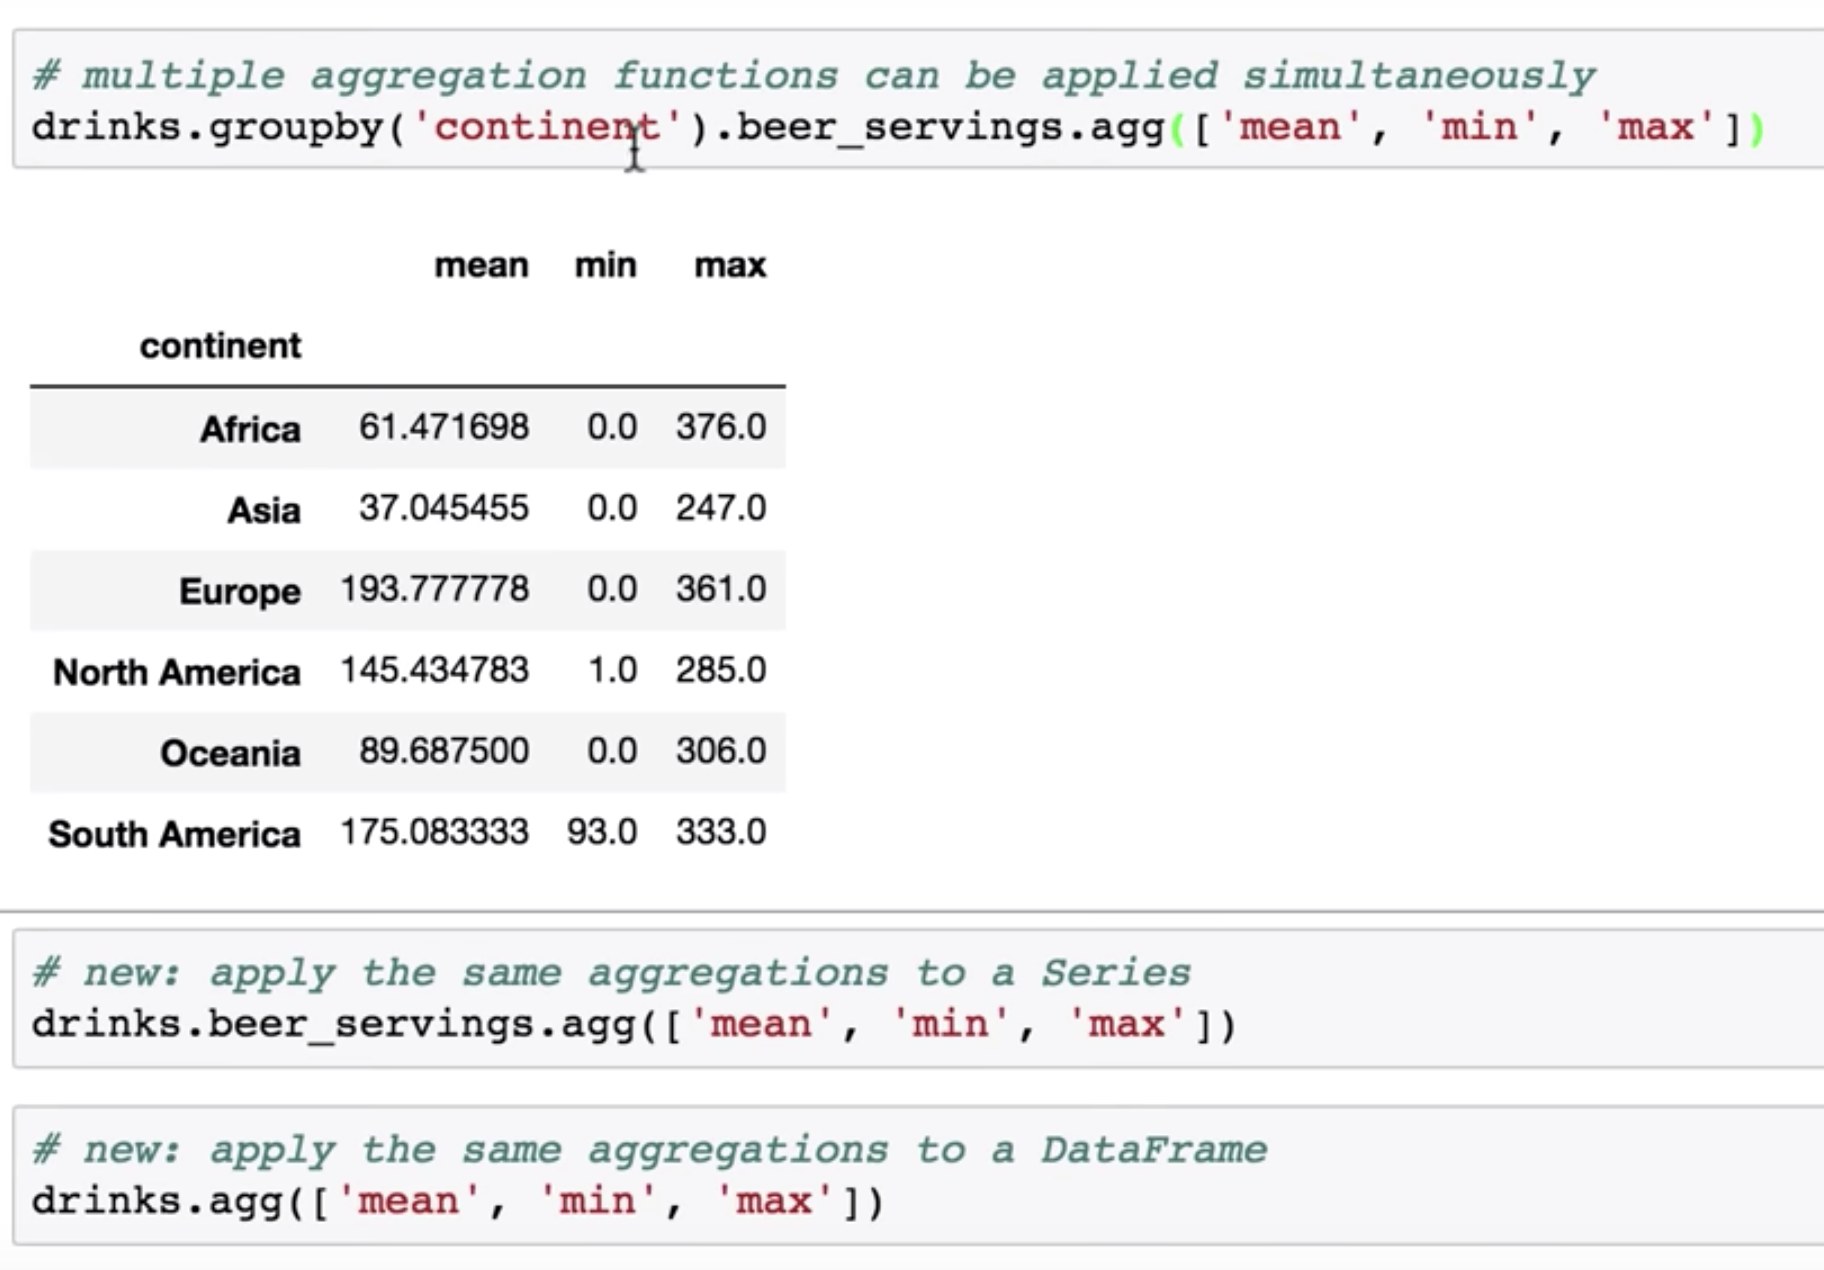
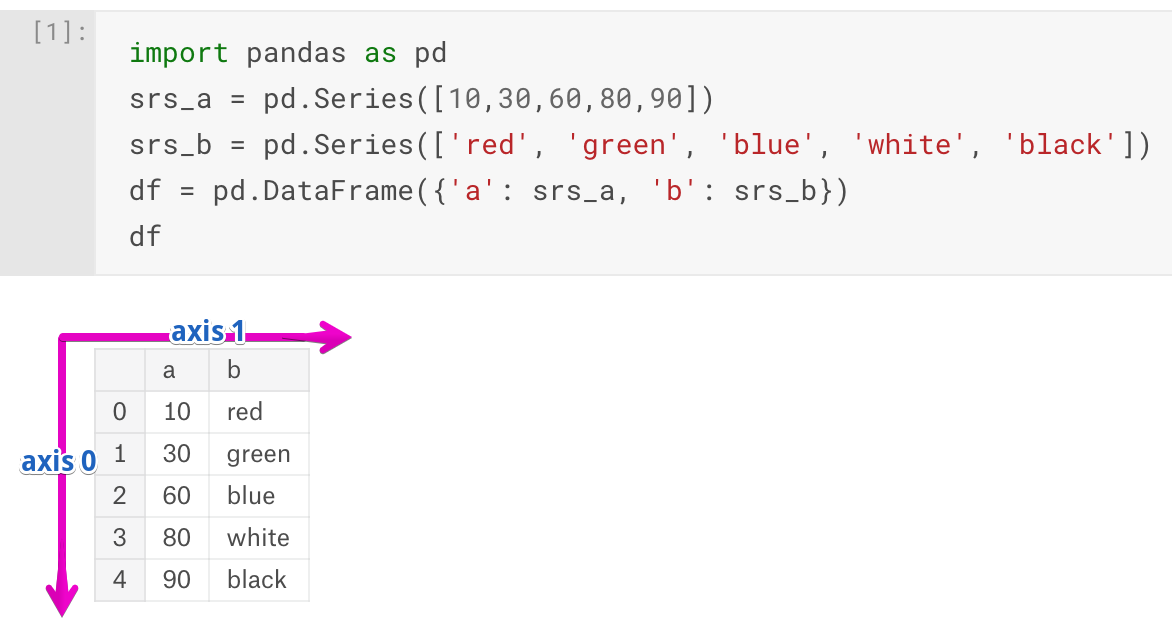
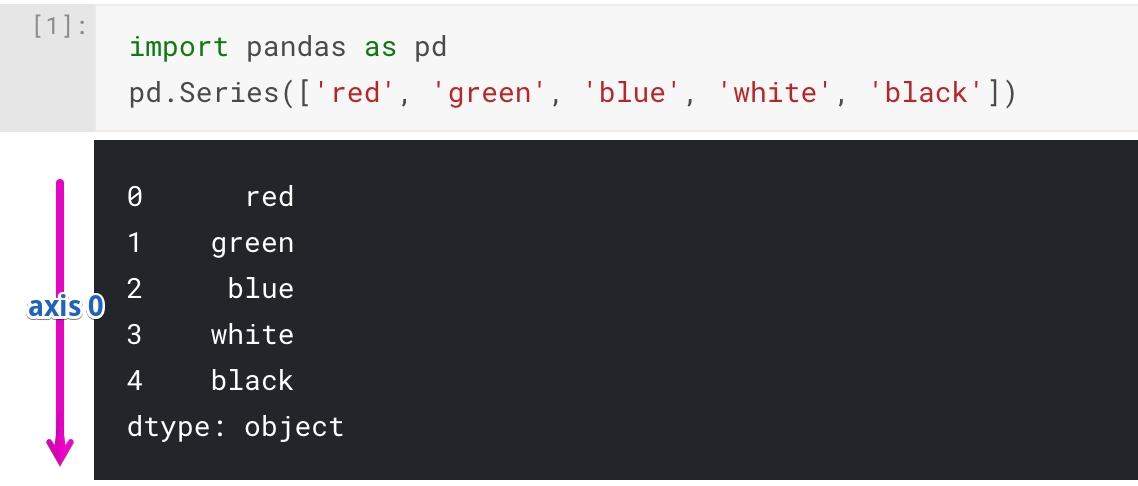
## 转换成DataFrame
pd.DataFrame(sndata)
> The resulting DataFrame will have its index assigned automatically as with Series, and
the columns are placed in sorted order:

## 去重复
sndata.duplicated(['MonitorFA'])
sndata[sndata.duplicated(['ComputerSN'],keep = False)]
Drop_duplicates当中的参数keep=False,意为重复项全部删除,它还有keep="first"与keep="last",分别对应在有多项重复时,保留第一项(或最后一项)

## 找出两个表不一样的地方
c=a.append(b)
c.drop_duplicates(keep=False,inplace=True)
c.reset_index()

## 删除 NA
df.dropna(axis=‘columns’,how=‘all’)

检测文件是否有 Header

1
2
3
4
5
import csv
path = r'C:\Users\scott\Documents\Test_Data\distribution\myfile.csv'
with open(path, newline='') as csvfile:
dialect = csv.Sniffer().has_header(csvfile.read(1024))
print(dialect)

大数据集处理

  1. 回收垃圾
  2. 提前设置好 dtype
  3. 选择有限的行,列
  4. 使用 chunk 分批导入、处理
  5. Tips 查看内存消耗: train.memory_usage(deep=True) * 1e-6
1
2
3
4
5
6
7
8
#import some file
temp = pd.read_csv('../input/train_sample.csv')
#do something to the file
temp['os'] = temp['os'].astype('str')
#delete when no longer needed
del temp
#collect residual garbage
gc.collect()

参考:https://www.kaggle.com/rohanrao/tutorial-on-reading-large-datasets#Large-datasets

Tidy Data 原则

  1. Columns represent separate variables
  2. Raws represent individual observations
  3. Observational units from tables

Cut 方法

用于检测数据的分类,比如19,20,35 对应人员年龄的分层。

1
2
3
4
5
import pandas as pd
pd.cut(a,b)

a: data
b:category info

时间日期处理

内容太多,只记录了个人的笔记。

1
2
3
4
5
6
7
8
9
10
11
12
13
14
15
16
17
18
19
# 时间切片
ts = pd.to_datetime('///')
ufo.loc([ufo.time >= ts],:)

# 星期、年、等计算
ufo.time.dt.dayofyear.head()

# 最新时间、计算
ufo.time.max() - ufo.time.min()

# 日期转换时间段
from datetime import datetime
from datetime import timedelta
from calendar import monthrange

start = datetime.strptime('20201402','%Y14%m')
_,days = monthrange(start.year, start.month)
end_str = f'{start.year}-{start.month}-{days}'
end = datetime.strptime(end_str,'%Y-%m-%d')

Category Datatype

  • object 通常是 string,这个object指向本来的python 的list或者dict对象
  • memory usage xxx+ KB, +的意思是最少需要这么多空间去存储这些引用
  • drinks.info(memory_usage='deep') : 查看真实的空间需求
  • 每一列需要的空间: drinks.memory_usage(deep=True)

append 和 concat

对于Series:

  • append会将index直接加上去,索引还是以前的,如果按照索引去选择,可能会返回多个数据, 最好在 append 后加上 resetindex
  • concat默认会重设索引,也可以使用ignore_index保留索引

对于DataFrame:

  • append:如果列名字一样,直接在后面添加,如果不一样,增加相应的列,填充空值。
  • concat:指定axis=0,则效果和append一样,axis=1,会合并值一样的行

append和concat操作中 index的变化:

1
2
3
4
5
6
7
8
9
10
11
# concat直接将两份数据合并到一起
# 如果你的两份数据分别是13年和14年的,你想要添加索引将其分开,可以使用:
rain1314 = pd.concat([rain2013, rain2014], keys=[2013, 2014], axis=0)

# 这样是以row名来分类,当然也可以用column名来分类:
rain1314 = pd.concat([rain2013, rain2014], keys=[2013, 2014], axis='columns')

# 合并两个dataframe不仅可以从数组中构造,也可以从dict中
# 这样就不必后期指定key的值了:
rain_dict = {2013: rain2013, 2014: rain2014}
rain1314 = pd.concat(rain_dict, axis='columns')

对于 join:

  • inner join, 把不同表中,索引名字一样的行的列合并,如果某些列没有的,则过滤掉这一行。
  • outer join, 把两个表合并,所有索引都合并,如果某些列没有值的,填充值为nanaxis = 1或者0, 对列或者行操作

Merge

merge默认指定的列来合并两个表的其他列,默认根据 index。

如果类似多索引的两个表,索引部分的值无法一一对应,那么就需要指定根据哪一列来merge,如果只指定了一列,那么肯定会有两个表都对应同一列数据的情况出现,可以用suffixes参数,来对这些列进行区分(一般是根据表名),当然也可以直接指定多个列来merge。

一般默认会使用index去merge,但更多的是使用lefton和righton参数来指定左右两个表中的列来merge。

从多标签中切分值

1
2
idx = pd.IndexSlice
slice_2_8 = february.loc['2015-2-2':'2015-2-8', idx[:, 'Company']]

多列操作

从多列创建日期

批量转换列的数据类型

批量对列使用聚合函数

批量重命名列

1
2
df.rename(columns = {'oldname':'new_name'},inplace=True)

避免赋值出现 warning

关闭科学记数法

1
2
3
4
5
# https://stackoverflow.com/questions/21137150/format-suppress-scientific-notation-from-python-pandas-aggregation-results
pd.set_option('display.float_format', lambda x: '%.3f' % x)

# 设置千分符
pd.set_option('display.float_format', lambda x:'{:,.0f}'.format(x))

By 行修改值

1
2
3
4
5
6
7
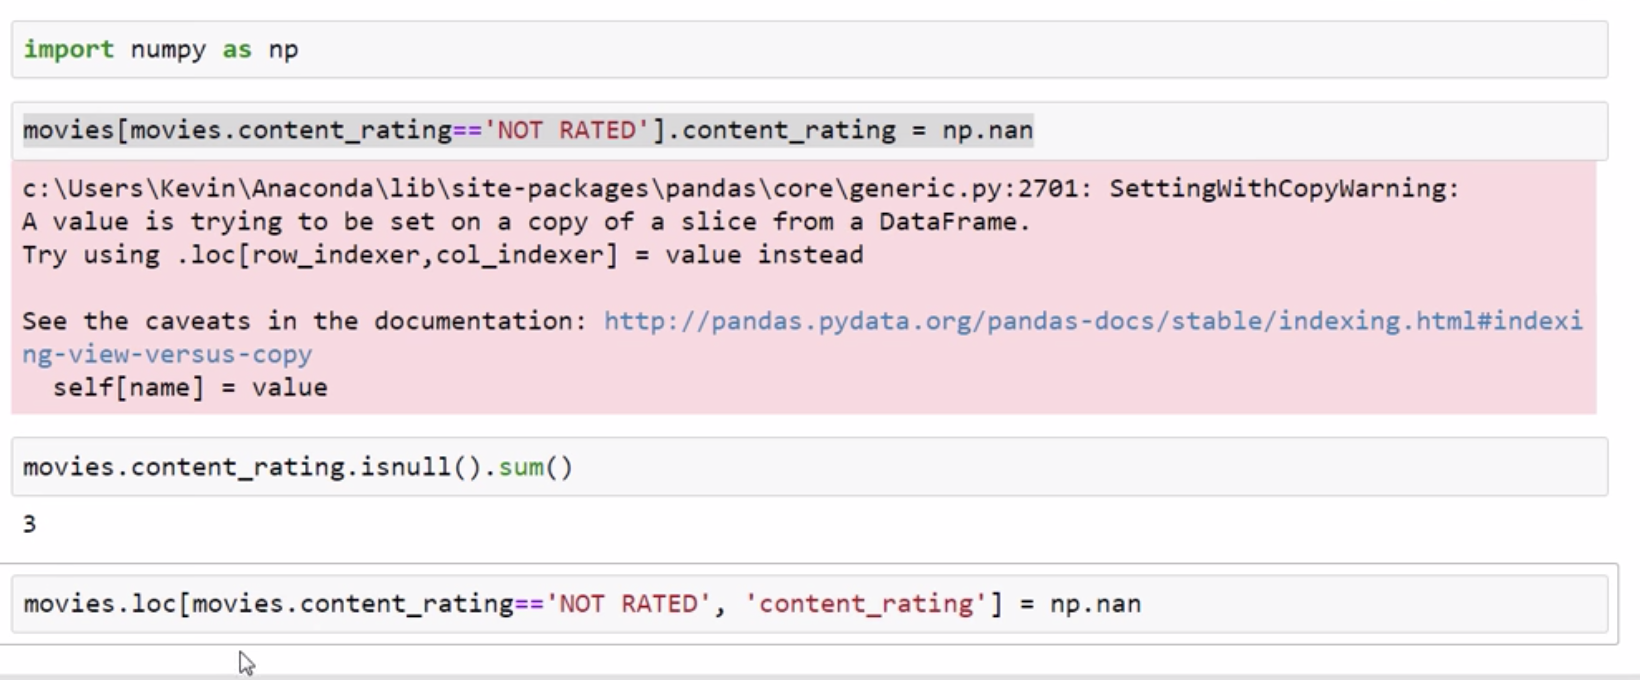
# https://stackoverflow.com/questions/23330654/update-a-dataframe-in-pandas-while-iterating-row-by-row
for row in df.itertuples():
if <something>:
df.at[row.Index, 'ifor'] = x
else:
df.at[row.Index, 'ifor'] = x
df.loc[row.Index, 'ifor'] = x
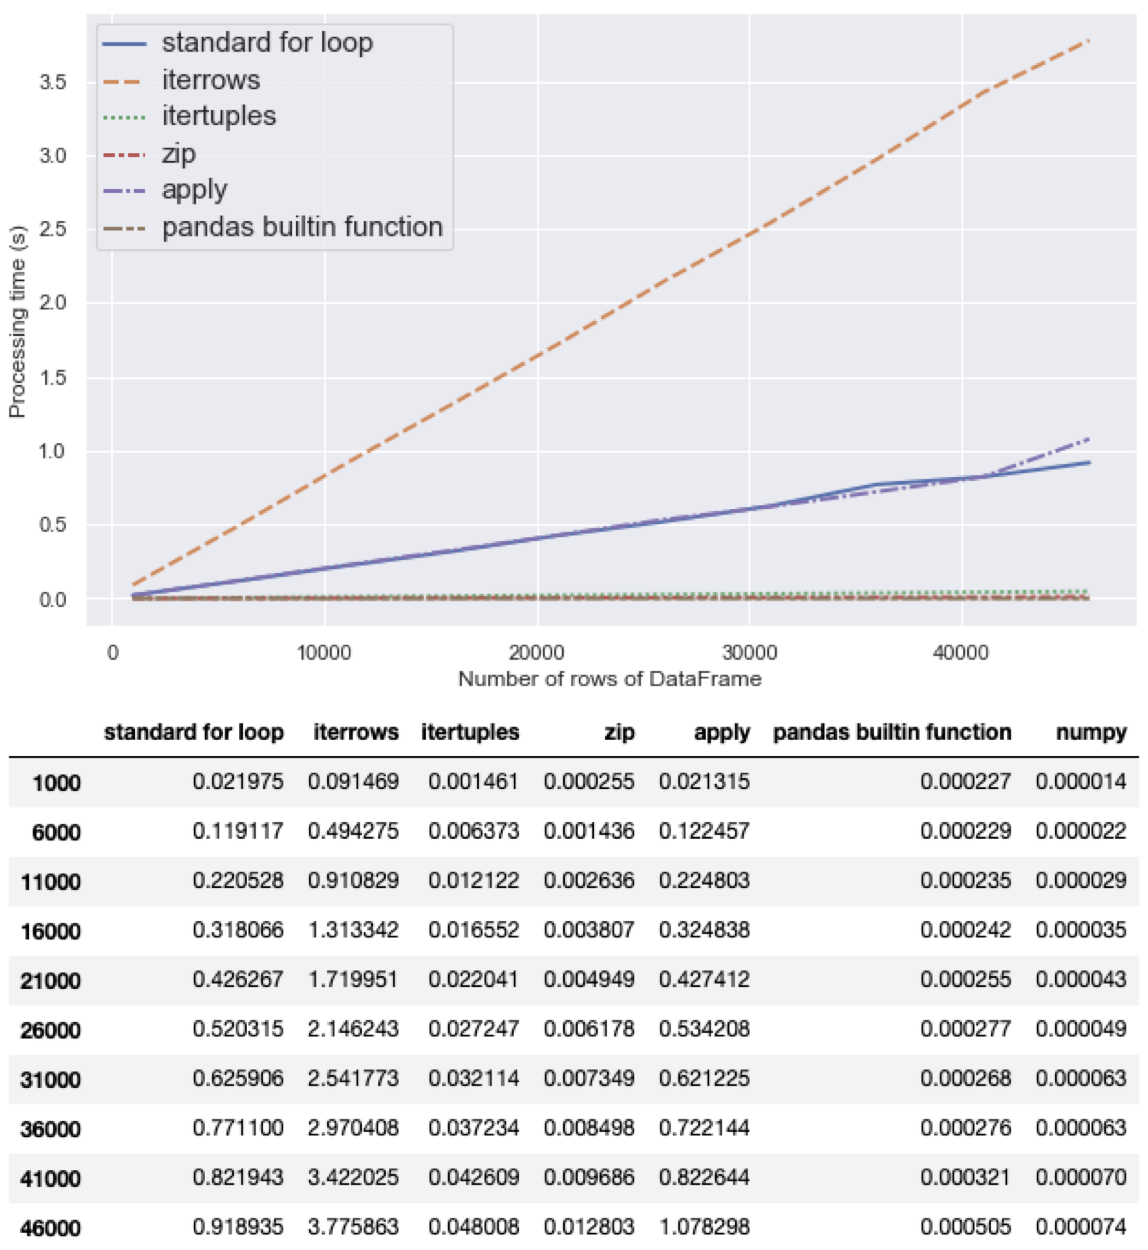
pd.iterrows 的限制

pd.DataFrame.iterrows you are iterating through rows as Series. But these are not the Series that the data frame is storing and so they are new Series that are created for you while you iterate.

Refer this

pd.xs 方法

多个 index 取值,但不能用来设置值,默认它返回原数据中的一份 copy。

1
2
# by default, returns a new dataframe with a copy of the data
df.xs('C')

Refer this

理解 Pandas 的 Axis

对于 Dataframe

  • “axis 0” represents rows direction and “axis 1” represents columns direction
  • 可以使用 “index” 与 “row” 代表 0; “column” 代表 1
  • Sum 应用到 “axis 0”,意味着 sum 每列的结果
  • Sum 应用到 “axis 1”,意味着 sum 每行的结果

dropna 可以默认是丢弃有 na 值的行,如果你需要丢弃有 na 值的列,将 axis 设置为 1 即可。

对于 Series

Series and DataFrame share the same direction for “axis 0”

提高 Dataframe 遍历速度

1
2
3
4
5
6
7
8
9
10
11
12
13
14
15
16
17
18
19
20
21
22
23
24
25
26
27
28
29
30
31
32
33
34
35
36
37
38
39
40
41
42
43
44
45
46
47
48
49
50
51
52
53
54
55
56
57
58
59
# For 循环,iloc 访问 df : 2.65 秒
def loop_with_for(df):
temp = 0
for index in range(len(df)):
temp += df['A'].iloc[index] + df['B'].iloc[index]
return temp

# For 循环,df.iterrows 访问 df:12.4 秒, 会花费大量时间在
# 创建 series 对象(且不会保留 dtype,如果需要建议使用 itertuples)
def loop_with_iterrows(df):
temp = 0
for _, row in df.iterrows():
temp += row.A + row.B
return temp
# For 循环,df.itertuples 访问 df:136 毫秒,终于来到毫秒级别
# 但它还是会创建 namedtuple
def loop_with_itertuples(df):
temp = 0
for row_tuple in df.itertuples():
temp += row_tuple.A + row_tuple.B
return temp

# 实际上,我们可以自己实现,避免创建 nameduple,使用 zip 函数
# For 循环,zip 函数访问,30 毫秒,这里的改进来自于避免创建 namedtuple
def loop_with_zip(df):
temp = 0
for a, b in zip(df['A'], df['B']):
temp += a + b
return temp

# 使用 pandas 自带的 apply 函数
# 3.28 秒,看起来和普通的 for 循环差不多
def using_apply(df):
return df.apply(lambda x: x['A'] + x['B'], axis=1).sum()

# 使用 pandas 自带的 add 函数
# 849 µs,pandas 自带的这种函数运行效率非常高
# 如果你的操作可以分解成这种就优先使用
def using_add(df):
return (df['A']+df['B']).sum()

# 如果你还是很在乎性能,可以使用 numpy
# 将数据转化成 numpy 的 array
# 186 µs,提升八倍
def using_numpy_builtin(df):
return (df['A'].values + df['B'].values).sum()

# 不同大小的数据,对结果会有影响,如果是大数据集,结果差距会非常明显,附图:
# iterrows 是效率最差的,其次是 apply,和 普通的 for 循环,两者差不多

# 如果一定要用 apply 怎么办呢?
# 可以使用如下的第二种方式, * here is to unpack all values in list

def using_apply(df):
return df.apply(lambda x: x['A'] + x['B'] + x['C'] + x['D'], axis=1).sum()

def using_apply_unpack(df):
return df[['A', 'B', 'C', 'D']].apply(lambda x: sum([*x]), axis=1).sum()

速度测试对比:

测试你代码的速度

1
2
3
4
# python 自带
%timeit using_numpy_builtin(df)
# notebook 自带
%prun -l 4 loop_with_iterrows(df)

使用 pd.wide_to_long

wide_to_long allows us to set stub names that can group columns.

Remember that wide_to_long() function takes the main arguments: i to set the unique row index, j to set the new variable name, and stubnames to extract the start of the wide columns.

needed to specify the separating elements. When you didn't do that, pandas didn't recognize the column names and returned an empty DataFrame.

Also, wide_to_long() always assumes that suffixes are numeric, so don't forget to specify if they are not!
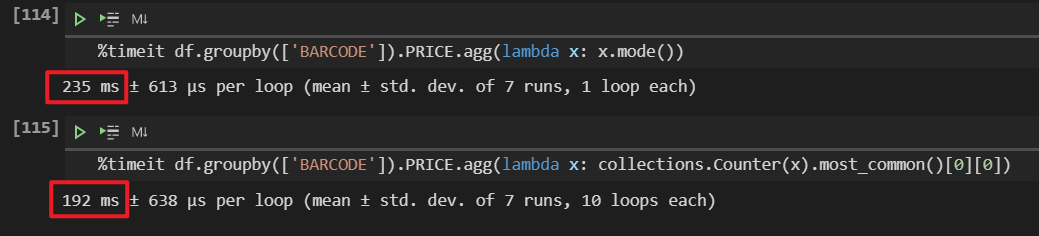
使用 pd.apply

创建列

1
2
3
4
5
6
df['Discounted_Price'] = df.apply(
lambda row: row.Cost - (row.Cost * 0.1),
axis = 1
)
# Print the DataFrame after addition of new column
print(df)

对比 map

1
2
3
4
5
p=pd.Series([1,2,3])
# apply 返回 dataframe,增加两列
a = p.apply(lambda x: pd.Series([x,x+1,x+2]))
# map,返回3个 Series
a,b,c = p.map(lambda x: pd.Series([x,x+1,x+2]))

Pivot 和 Pivottable

When the .pivot() method finds two rows with the same index and column, but different values for the values, it doesn't know how to handle it.

Dataframe 增加总和(Grand Total)

1
2
3
# https://stackoverflow.com/questions/21752399/pandas-dataframe-total-row
df.loc['Column_Total']= df.sum(numeric_only=True, axis=0)
df.loc[:,'Row_Total'] = df.sum(numeric_only=True, axis=1)

Pandas 求众数

两种方法都可以,性能差异不大:

根据条件对列赋值

1
2
3
4
5
6
7
8
9
10
11
12
13
14
15
16
17
18
19
20
21
22
23
24
25
26
27
28
29
30
31
32
33
34
# 1. Numpy Where 方法
df['hasimage'] = np.where(df['photos']!= '[]', True, False)

# 2. Numpy Select 方法
import pandas as pd
import numpy as np

# read data
all_ = pd.read_excel('./scott.xlsx',sheet_name='ALL')
enc_ = pd.read_excel('./scott.xlsx',sheet_name='ENC')
result = pd.read_excel('./scott.xlsx',sheet_name='result')

# enc store list unique array
enc_store_list = enc_.STORECODE.unique()

conditions = [
all_.STORECODE.isin(enc_store_list),
~all_.STORECODE.isin(enc_store_list)
]

# PVAL_OLD values
pval_new_values = [
0,
all_[conditions[1]].PVAL.values
]
pvol_new_values = [
0,
all_[conditions[1]].PVOL.values
]

all_['PVOL_NEW'] = np.select(conditions,pvol_new_values)
all_['PVAL_NEW'] = np.select(conditions,pval_new_values)

all_.rename(columns={'PVOL':'PVOL_OLD','PVAL':'PVAL_OLD'})

使用多进程提高数据处理速度

我们知道 Python 因为 GIL 的关系,对于 CPU 密集操作无法有效利用多核处理器,我们可以使用多进程来打破这个限制。

1
2
3
4
5
6
7
8
9
10
11
12
13
14
15
16
17
18
19
20
21
22
23
24
25
26
27
28
29
30
31
32
33
34
35
36
# 假设有以下代码
import random
import pandas as pd
import numpy as np
from multiprocessing import Pool

def add_features(df):
df['question_text'] = df['question_text'].apply(lambda x:str(x))
df["lower_question_text"] = df["question_text"].apply(lambda x: x.lower())
df['total_length'] = df['question_text'].apply(len)
df['capitals'] = df['question_text'].apply(lambda comment: sum(1 for c in comment if c.isupper()))
df['caps_vs_length'] = df.apply(lambda row: float(row['capitals'])/float(row['total_length']),
axis=1)
df['num_words'] = df.question_text.str.count('\S+')
df['num_unique_words'] = df['question_text'].apply(lambda comment: len(set(w for w in comment.split())))
df['words_vs_unique'] = df['num_unique_words'] / df['num_words']
df['num_exclamation_marks'] = df['question_text'].apply(lambda comment: comment.count('!'))
df['num_question_marks'] = df['question_text'].apply(lambda comment: comment.count('?'))
df['num_punctuation'] = df['question_text'].apply(lambda comment: sum(comment.count(w) for w in '.,;:'))
df['num_symbols'] = df['question_text'].apply(lambda comment: sum(comment.count(w) for w in '*&$%'))
df['num_smilies'] = df['question_text'].apply(lambda comment: sum(comment.count(w) for w in (':-)', ':)', ';-)', ';)')))
df['num_sad'] = df['question_text'].apply(lambda comment: sum(comment.count(w) for w in (':-<', ':()', ';-()', ';(')))
df["mean_word_len"] = df["question_text"].apply(lambda x: np.mean([len(w) for w in str(x).split()]))
return df

def parallelize_dataframe(df, func, n_cores=4):
df_split = np.array_split(df, n_cores)
pool = Pool(n_cores)
df = pd.concat(pool.map(func, df_split))
# 对Pool对象调用join()方法会等待所有子进程执行完毕,调用join()之前必须先调用close(),调用close()之后就不能继续添加新的Process了
pool.close()
pool.join()
return df
# 使用
train = parallelize_dataframe(train_df, add_features)

关于多进程,可以点击了解更多。